Friday, August 10, 2012

Moving down the road

The Liberty Tree
I've recently been introduced to WordPress, as in my lovely new job uses WordPress for all our blogs, so I've gotten pretty familiar with it.  And... I love it.  Not that it doesn't make me want to rip my hair out at times.  Everyone knows that not only is everything you read online true, but it is inevitable to give you a headache.  (Alright... so only the later is true).

Since I am always in WordPress, I've decided to move this blog on over there.  It makes more sense, because then I don't have to divide my attention between two platforms -- and we all know me being more distracted will result in even fewer posts (honestly, between February and July I have been crazy busy!!).

So, I've moved the posts over to the new blog, so you don't have to worry about visiting both (see how nice I am!!).

Update your addresses: http://libertytreetreats.wordpress.com/

Tuesday, August 7, 2012

Oreo Cookie Happiness!

I love Oreos.  Who doesn't love Oreos?   Back in March, that lovely cookie celebrated its 100th birthday!  I decided it was imperative for Gabe and I to celebrate.   I discovered a wonderful recipe from the Lovin' From the Oven blog, which I heartily recommend to all!

Gabe and I broke out our kitchen gear to make Chocolate Chip Oreo Cookies -- seriously they are as good as they sound.

What You'll Need:
  • An awesome sous chef to assist you in your baking happiness   
  • Rolling pin
  • Ziplock bags
  • Oreos
  • Chocolate chips
  • Toffee bits
Ingredients: 
  • 1 stick butter, softened
  • 6 TBSP sugar
  • 6 TBSP brown sugar
  • 1 egg
  • 1 tsp vanilla extract
  • 1 1/4 cup flour
  • 1/2 tsp baking soda
  • 1/2 tsp salt
  • 11 Oreos, broken up/crushed
  • 1/2 cup chocolate chips
  • 1/2 cup toffee bits 
Alternative -- If you don't like toffee, just add 1 cup of chocolate chips
 
Let's Get Baking!!
 
First off - tell those Oreos that you love them and you don't want to beat them up with the rolling pin, but sometimes, you gotta do, what you gotta do.

Place the Oreos into a ziplock bag and using the rolling pin lightly, break 'em up.   Gabe the sous chef,  shows you how its done.

Preheat the oven to 350 F.


Mix the butter and sugar together until creamy.  Add the egg and vanilla and mix well.

In a separate bowl, combine the flour, baking soda and salt.  Gradually add the dry ingredients to the wet ingredients.

Stir in Oreos, chocolate chips and toffee pieces, until combined.

I taught Gabe to stir by telling him to pretend to be a witch stirring his cauldron,  two hands on the spoon, while I hold on to the bowl.  The reason for this - practicality - when he tried stirring like me, we ended with with tons of dough outside the bowl.  This cookie is not an easy job with combining the Oreo, chocolate chips and toffee bits. 

Drop spoonfuls of dough onto a cookie sheet and bake for about 10 minutes.  You want them to be still a little soft.  Remove from oven, let sit for 3 minutes and then transfer to cooling sheet.

Enjoy!


The New Fad: Cake Pops

I freely admit that I launched on to the Cake Pop fad like no tomorrow, making them left and right.

Since most of our baking is gluten-free, I have a feeling that the mere fact that these little babies often tasted like ding dongs was a glorious reason for why they were made so often.

No joke, go out and buy on of Betty Crocker's Chocolate GF cake mixes, add a package of chocolate pudding (for moisture) and then use a chocolate fudge icing to mix... and bingo instant GF ding dong. 

An added bonus I discovered during Gabriel's birthday is that he loves these things.  The boy can't stand cake, even turns his nose up at cupcakes, but hand him a cake pop and he'll eat them till he is sick.  Even his brother and sister loved them (needless to say, his birthday party turned out to be a big hit with those three!).

Easy peasy instructions -- but they do take some time.

What you need:
  • A cake mix of your choosing
  • Tub of icing of your preference
  • 1 bag of candy melts 
  • Candy sticks
  • Foam of some sort to hold cake pops while dry
Grab a cake mix and prepare as directed.  Let the cake cool and then crumble away (I admit this is my favorite part - the cake is soooo fluffy!).  Mix in 3/4 tub of your prefered icing and mix until it disappears.  Grab a bit and roll it into balls.  Place on a covered cookie sheet and stick in the freezer.  The colder you get these things the better they are at standing up to the candy coating step!  Generally I found 10 min in the freezer was good... or 30 min in the fridge.

While the cake balls are getting cold, melt the candies as the directions state.

Using a spoon, place the balls into the melted candy and cover, do your best to shake off excess candy.  If you are going to put them on sticks and truly have 'cake pops' - dip the stick in the candy melt before inserting into cake, and let dry by placing stick on foam.  Alternatively, you can just have 'cake balls' and bypass the stick part, just place them on the cookie tray to dry.

I got a little creative with these around Valentine's Day.  I found some candy mould trays and filled them with the cake mixture, then placed the trays into the freezer.  You can then pop the cake out of the mould and dip in candy coating, giving you little cake hearts, etc.  (I know I have pictures of these project somewhere... but alas they seem to be missing at the moment.)  

Have fun!

Monday, February 27, 2012

Red Velvet Cheesecake

I admit it... I have been remiss in providing recipes.  Life gets in the way of the best laid plans.  However, free time abounds (slightly) and I am going to endeavor to ameliorate my bad behavior!  My peace offering is in the form of a heavenly dessert.... Red Velvet Cheesecake!

One small note in this recipe, if you dying for the flavour of red velvet cake, this cheesecake will not feed your need for a fix... it is tasty for sure, but the flavor of the cheesecake is weak in comparison to the cake.   

A few notes about this recipe:
  • This is probably one of the most involved cheesecake recipes I've made, so allocate yourself at least three hours to make this cheesecake (more if you have the time).  
  • The water bath I mention isn't necessary, it just helps preventing cracks from forming in the top of the cheesecake, if you don't mind them, go ahead and skip it - cooking time and temperatures remain the same either way. 
  • The icing is sweet.  If you don't want the added sweetness you can leave the frosting off or use less.

 
Ingredients:

Crust:
17 Oreo cookies, crushed finely
1/4 cup butter, melted
1 Tbsp granulated white sugar

Cheesecake:
3 (8 oz) packages cream cheese, room temperature
1 1/2 cups granulated white sugar
4 large eggs, lightly beaten
2 Tbsp flour
3 Tbsp unsweetened cocoa
1 cup sour cream
1/2 cup buttermilk 
2 tsp vanilla extract
1 tsp distilled white vinegar
2 oz red food coloring

Frosting:
3 oz cream cheese
1/4 cup butter, room temperature
2 cups powdered sugar
1 tsp vanilla extract   

Let's Get Baking!
Prepare crust: Stir together Oreo crumbs, melted butter, and 1 Tbsp granulated sugar; press into bottom of a 9-inch springform pan.

Preheat oven to 325 degrees F.   Prepare a water bath: Fill large pan (one big enough to fit springform pan) with about 1 inch of water.   Place in oven and allow to preheat along with oven.

Prepare Filling: Beat cream cheese and sugar at medium-low speed with an electric mixer for 1 min.  Add eggs and remaining cheesecake ingredients, mixing on low speed until fluffy.  Pour batter into prepared crust.

Take out two sheets of heavy duty foil and layer them on top of one another.   Place springform pan on top of the foil and wrap gently around the pan  and up the sides (you don't want tears or holes to prevent water leaking in).   Place  in water bath in oven.

Bake for 10 minutes; reduce heat to 300 degrees F.  Bake an additioanl 75 min. or until the center is firm.  Turn oven off.  Let cheesecake stand in oven for 30 minutes.  Remove cheesecake from oven.  Carefully remove from water bath and place on wire rack.   Run a thin knife around the outer edge of the cheesecake.  Cool on rack, until cheesecake nears room temperature.  Cover and chill for at least 8 hours.  Remove sides of springform pan.

Prepare frosting: Beat cream cheese and butter at medium speed  with an electric mixer until smooth.  Gradually add powdered sugar and vanilla, beating until smooth.  Spread evenly on top of cheesecake.

Enjoy!

Wednesday, October 12, 2011

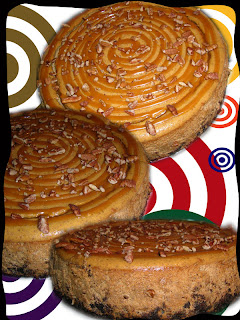
Pumpkin Pie Cheesecake

I know what you all are thinking.... finally a new recipeSorry to be holding back the bakery goodness.  Even though I only put recipes on this blog, I just might add an entry about what else has been distracting me.  Let just say it is some Steampunk goodness for the Halloween season! 

My Pumpkin Pie cheesecake caused me some irritation.  Probably the most frustration I have yet to encounter.  As a warning... caramel sauce is finky!  It tastes wonderful, but be prepared and have extra supplies on hand, just in case.

Now down to the good bits - the actual 'how to' portion!


Extras You'll Need: 
Pureed pumpkin -- Heavy Whipping Cream -- Crushed Pecans

Chocolate Pecan Crust
  • 1 1/2 c. - ground pecans
  • 1 c. - flour
  • 1/3 c. - sugar
  • 1/4 c. - melted butter
  • 2 oz  - semi-sweet chocolate, melted
 Pre-heat oven to 350 degrees. Combine pecans, sugar, flour, melted chocolate and butter. Pat into 9" spring-form pan. Bake for 10 minutes. Let cool.

Pumpkin Pie Cheesecake
  • 4 - 8 oz packages of Cream Cheese, softened
  • 1 c. - sugar
  • 1 - 15 oz can pumpkin
  • 1 tsp - vanilla
  • 4 eggs
  • 5 tsp - cinnamon
  • 2 1/2 tsp - ground ginger
  •  2 1/2 tsp - ground nutmeg
  • 1 1/4 tsp - ground cloves
Beat cream cheese and sugar in a large bowl until well blended. Add pumpkin, spice and vanilla; mix well. Add eggs, one at a time, mixing slowly after each until just blended. Pour into crust. Bake for 1 hour 20 min to 1 hour 30 min or until center is almost set. Loosen cake from rim of pan; cool before removing rim. Refrigerate 4 hours.  
 Caramel Sauce 
  •  1 c. - sugar
  • 6 Tbsp - butter 
  • 1/2 c. - heavy whipping cream
Have everything ready to go around pan.  Heat sugar on moderately high in non-stick 2-3 quart saucepan.  As sugar begins to melt, stir vigorously with whisk or wooden spoon.  Once sugar comes to boil, stop stirring.  Once totally melted,  the liquid sugar should be a darker amber colour.  Immediately add butter to pan and whisk until butter has melted (beware: it will foam with addition of butter).  Once butter has melted, take pan off heat, count to three and slowly add cream.  Continue to whisk until incorporate (beware: it will foam).  Whisk until caramel sauce is smooth.  Let cool in pan for couple of minutes,  then pour into glass jar and let cool to room temperature.  Warm before serving.  -- Can be stored up for 2 weeks.   

Make it Pretty
Once caramel has cooled enough, pour the caramel over the cheesecake and sprinkle with crushed pecans.  
Enjoy!

Monday, September 26, 2011

Hello Pumpkin!

Fall is my absolutely favorite season, especially for baking, because I love pumpkin and cinnamon.  I recently found two recipes online, one for pumpkin spice whoopie pies and another for a Mexican brownie bottom cheesecake.  I'll get those up here soon.  Since only slightly modified them, I'll make sure to include the links to where I found the recipes. 

As to the future of the fall season baking.  My mum made me a pumpkin cake with cream cheese filling for my birthday - which has led to a new inspiration for me.  I've decided it time to make some pumpkin cheesecake.  Who knows where this desire to make cheesecake suddenly came from -- though if you went to Taste of St. Louis this past weekend and tried a slice of cheesecake from Hank's Cheesecakes you are probably obsessed also.    So on the docket to make this week will be chocolate crusted pumpkin cheesecake with caramel and pecans.  (I am also apparently digging into my southern roots...). 

Sunday, July 31, 2011

As American as Apple Pie

Apparently road trips are great ways to think of cupcake ideas!  A drive through Arkansas provided me with the inspiration to create apple cinnamon cupcakes filled with caramel and topped with apple cream cheese frosting.  The camera cord is currently MIA, so this entry will also be photo-less.  This is turning into a not so positive trend. 

Anyway!  The friend I made these for proclaimed that they reminded her of her grandmother's apple cake and that the finished product was delicious.  So I hope you find them just as tantalizing! They are a little more time consuming because of the filling, probably budget about 3 hours.  Again though, you can do it in stages or adjust the recipe how you like.

What You'll Need:

If you do not already have cream cheese, powdered sugar, ground cinnamon, walnuts, caramel or apples you will want to purchase these for the cupcakes.  You will need 4 oz. of cream cheese, 2 cups of powdered sugar and about 3-4 apples. 

For the apples, you will want to locate sweet apples - such as Red Delicious or Golden Delicious.  For the garnish you will need to about 2 apples, these you will want to be semi-sweet, like Gala or Fuji.     

For the caramel, you could purchase caramel candies and melt them or if possible caramel bits you add water or milk for melting.  If you want to make home-made caramel sauce I will include the recipe below.   

Ingredients:

2 cups - diced apples
1 1/4 tsp - ground cinnamon
2 Tbsp - apple juice
1 pkg. - french vanilla pudding
1 pkg. - white cake mix
    -- additionally you'll need the ingredients listed on the cake mix

Stir Up Some Goodness:

Prepare cake mix as directed on package.  Add pudding and cinnamon, mix well.  Stir in diced apples and apple juice.  Line cupcake pan with paper liners and fill with batter (about 3/4 full or more if you want a larger top).  Bake in oven at 350 degrees until golden brown, remove and let cool.

Caramel Sauce:

There are two choices - get a bag of caramels and melt them in 2 Tbsp of water (about two minutes) or you can make the sauce.

For the Sauce: 

1 1/2 cups - sugar
1/3 cup - water
1 1/4 cups - heavy whipping cream
1/2 tsp - vanilla extract

Set out ingredients in easy to grab areas around the stove.  The process is very fast, slow moving could end with a burnt mess rather than caramel sauce.  Heat sugar and water in a saucepan on low heat until sugar dissolves.  Increase the heat and boil sugar until it turns medium-brown.  Watch the sugar carefully to ensure it doesn't burn as it reaches this point.  Gradually add the heavy whipping cream and vanilla extract.  *Watch that it doesn't spatter on you!*  Simmer until sauce becomes smooth and thick (about 2 min).   Let cool.

Fill the cupcakes!:

Using a melon baller, knife or other utensil, create hole in middle of cupcake - going about 1/2 to 2/3 the way down.  Fill a icing bag with cooled (room temp!) caramel and fill cupcakes.  (A helpful cheat here is to fill a ziplock bag with the caramel and cut off a small bit of the corner if you don't have icing bags).

Apple Cream Cheese Frosting:

2 tsp - apple juice
4 oz - cream cheese, softened
4 oz - butter, room temp
2 cups - powdered sugar

Blend cream cheese and butter until smooth.  Add powdered sugar, one cup at a time.  Stir in apple juice.  If your kitchen is warm and the frosting has gotten too soft to frost the cupcakes, let it cool in the refrigerator until firms up.  Top cupcakes with desired amount of frosting.

Garnish to Complete:
If you want to make the cupcakes look elegant you can add garnish.  Make up some cinnamon-sugar and sprinkle on top of the frosting.  Slice the semi-sweet apples (pretty thin) and place a slice or two on top of the cupcakes.  Add chopped walnuts to finish off!

Enjoy!